
Sunday, April 17, 2016
Mordor Uruk Hai Banner conversion
Another conversion from Shadow and Flame. Another conversion in the in the display cabinet. Those Mordor Uruk Hai are very fun to paint.


Friday, April 8, 2016
Dol Amroth Command
Its been a long, long time since I painted anything from Dol Amroth. I happened to open a box in the closet the other day and the command blister was on top so I figured what the hell and painted them up. Very fun models, I've always liked them.

I was never a big fan of the all silver metal so I tried to break it up some with some gold effects and outline work.

This banner is actually very well suited for free hand. There are minimal folds in it so its really just a large canvas with the swanship in the middle.

Monday, March 14, 2016
Armored Glorfindel Conversion
This whole starlight nighttime cloak is a theme that has been growing on me. This time I tried my hand at a sunrise over water although its a bit obscured by the shield. Its another conversion by...you guessed it...Shadow and Flame, this is the armored Glorifndel converted to have the sword drawn behind his head and bow in the other hand, quiver on the leg and shield across the back. I actually finished this in a day which is a good clip for me. He will go with the rest of the elves I am painting similarly. Hope you like him, I sure do.


Saturday, March 12, 2016
Iron Hills Dwarf Conversions
What a haul to paint all of these kind of at once. More great stuff from Shadow and Flame. I actually have the captain finished as well but I will save him for another post. I liked the idea of movement trays for these but since they are hard to come by I made my own. Like The dudes rug, I think they really tie it together.
Here they are, all 12 of them in their filthy glory:


Lots of fun to paint and they will make for a nice Iron Hills army that will hopefully grow in time.
Thanks for looking.
Monday, March 7, 2016
30,000 views !!!
PME Just hit 30,000 views! I can't thank you enough for the support, comments, votes, and tips. Even if you just visited or Google inadvertantly led you to my page you have my thanks for taking the time to look at what I have here.
Hopefully over the next 30,000 you'll see me improve and see some posts of published photos. I have some models in the 2014 CMON annual (if it ever comes out) and White Dwarf would like to publish some of my work if I can get the photography right.
So again, many thanks to everyone who has ever taken a moment to stop by. Until next time, have fun slinging paint!
Hopefully over the next 30,000 you'll see me improve and see some posts of published photos. I have some models in the 2014 CMON annual (if it ever comes out) and White Dwarf would like to publish some of my work if I can get the photography right.
So again, many thanks to everyone who has ever taken a moment to stop by. Until next time, have fun slinging paint!
Sunday, February 21, 2016
Painting Jigs
First of all I must say I have been overwhelmed by the response to my last about my Rivendell Knight. Thanks so much for the support. It had 300 views in 12 hours and this week will probably end up taking over the second most post I have (which is currently occupied by a post I made over two years ago). The mini is currently stuck at 38 votes on CMON so if you have a second to register a vote I would greatly appreciate it and you can do so HERE.
Not a painted miniature for this post, but its related. I thought I would take you through my process for building painting jigs. I was tired of always having to hold the miniature by the model itself and scrape off paint, or attach the model to a base so I could paint it, because I usually make scenic bases after painting the model. I saw something similar to these somewhere and decided they were easy enough to build so I built my own. Shadow of Shadow and Flame recently asked me for some more so I built three different styles: A single mini jig (SMJ) with one bolt, a multi-mini jig (MMJ) with two bolts, and a half single mini jig for sculpting (HMJ) for Flame to try out and see how it works.
First step is to buy the proper material for the jigs.
NOTE: all measurements here are giving in the completely nonsensical English units metric makes way too much sense to be used by 'Murica. So for my more sensible metric-using friends 1 inch (1") = 2.54cm.
Also, you can go to Online Conversion to convert any measurements here into what ever you want, so, for example, if you decide to make all your measurements in Furlongs, these guys have you covered.
1. Any length of 1 1/2" x 3/4" pine board (they make these out of all different wood but pine is cheapest)
2. 2" x 1/4" bolts with one nut and two washers per bolt.
3. miter box and saw (optional) any hand saw or electric saw will work
4. drill press (optional) any electric drill will work
5. 1/4" drill bit
I marked off the jigs into 2" sections for SMJs, 4" sections for MMJs, and 1" for HMJs. I have a miter box set up for cutting straight lines. Its not imperative that the lines are straight, but it makes for nicer jigs that are easier to work with. Cut the board up into the proper lengths, two pieces for each jig, for however many you need.

Side note: fishing gear and goose decoys pictured here are also an optional part of this process. Here is what they should look like when all cut up (except the HMJ is not pictured here):


The next step is to mark off and drill your holes for the bolts. for SMJs the hole is right in the center, 3/4" down and 1" in from the edge. For MMJs they are 3/4" down from the top and each bolt is measured 1" in from the outside. For HMJs the hole is 1/2" in and 3/4" down. OK, for this step I used a drill press and drill press vise. Again, this is completely optional, any electrical drill will work. However the drill press affords you the opportunity to drill straight holes which will allow the jig blocks to move more easily along the bolt. Clamp both halves of the jig into the vise and drill through both at the same time (to ensure the holes line up properly) with a 1/4" drill bit. IMPORTANT: For the MMJs, after drilling the first hole, run the bolt through the hole to hold the halves in place. This will ensure that the two haves don't slip any when you move to drill the other hole and the jigs will slide along each bolt much more easily.

We are getting there now. Put a washer on one end of the bolt and run it through the jig halves. Place another washer on the other end and then the nut. The size of the washer is optional. I think I used 7/8", but the bigger the diameter of the washer the more surface area of the jig sides it will apply pressure to when you tighten down the nut. I haven't had any problems with the size I am using, but you can't go wrong with larger ones:
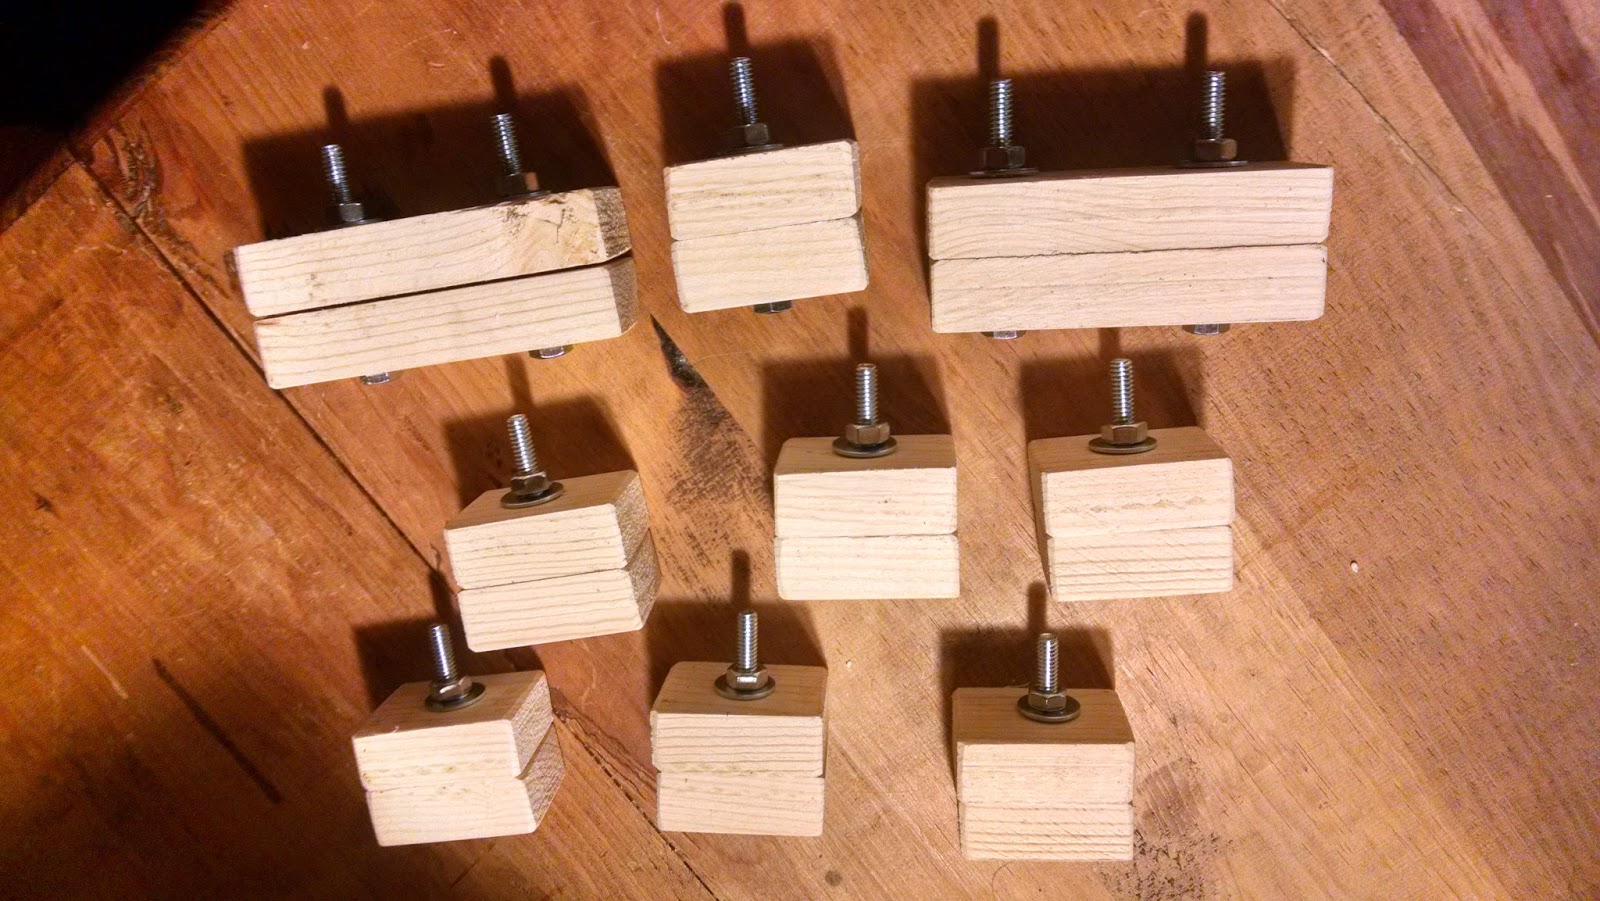
Note: Pictured here are actually 2 1/2" bolts. They are good because you can open the jigs up further if you need to. However, this particular type of bolt is not threaded all the way to the top so the nut just barely holds the jig edges together. I like the 2" better. You just want to make sure that when the jig is closed on your mini you have threads sticking out of the side, and not the threaded part if you get that type of bolt.
Here is a picture of a jig in action, I know, breathtaking to see it work isn't it?

Final step: Congratulate yourself on a job well done, then slap a miniature in there and sling some paint at it.
I have a few miniatures I need to get photographed and uploaded so hopefully I'll have something new up here this week. In the meantime, I hope you found this useful.
Monday, February 15, 2016
I've put this off for far too long.....Rivendell Knight
This miniature has been one of the strangest journeys for me. I started it largely to test myself at painting a grey horse. Then, for what ever reason I totally and completely lost interest in finishing the knight. It has sat on the paint station, been in the background of other photos, and generally been used as comedic insult to me for well over a year. Then last week I got inspired to paint it. I am now so enthused about it that I cant wait to paint another. In the end I think it was the cloak. I think the sculpts themselves are wonderful. And the dynamic sense they give is great. However the huge surface area was a real challenge for me and that is what hung me up on finishing it. I had it a brown color not unlike the box art and it never appealed to me. And I never really had a nice theme to tie it all together. I was inspired to do some freehand work and it was either dig out some knights of Dol Amroth or paint this guy right in front of me. After that it just snowballed. I settled on a scheme and repainted parts I had already done, updated the armor and edged it all in three shades of gold and painted the banner to match which went through a few color changes itself. Wet blending and I became good friends on this one. Anyway, it was an absolute joy to paint and I am really happy with it. I plan to submit it to Warhammer Visions so they can reject it! Here it is.....finally:


As always, thanks for looking!
UPDATE: I added this guy to my CMON gallery. If you have a second to spare and could cast a vote clcik HERE. I would greatly appreciate it!
Subscribe to:
Posts (Atom)