PME Just hit 30,000 views! I can't thank you enough for the support, comments, votes, and tips. Even if you just visited or Google inadvertantly led you to my page you have my thanks for taking the time to look at what I have here.
Hopefully over the next 30,000 you'll see me improve and see some posts of published photos. I have some models in the 2014 CMON annual (if it ever comes out) and White Dwarf would like to publish some of my work if I can get the photography right.
So again, many thanks to everyone who has ever taken a moment to stop by. Until next time, have fun slinging paint!
Monday, March 7, 2016
Sunday, February 21, 2016
Painting Jigs
First of all I must say I have been overwhelmed by the response to my last about my Rivendell Knight. Thanks so much for the support. It had 300 views in 12 hours and this week will probably end up taking over the second most post I have (which is currently occupied by a post I made over two years ago). The mini is currently stuck at 38 votes on CMON so if you have a second to register a vote I would greatly appreciate it and you can do so HERE.
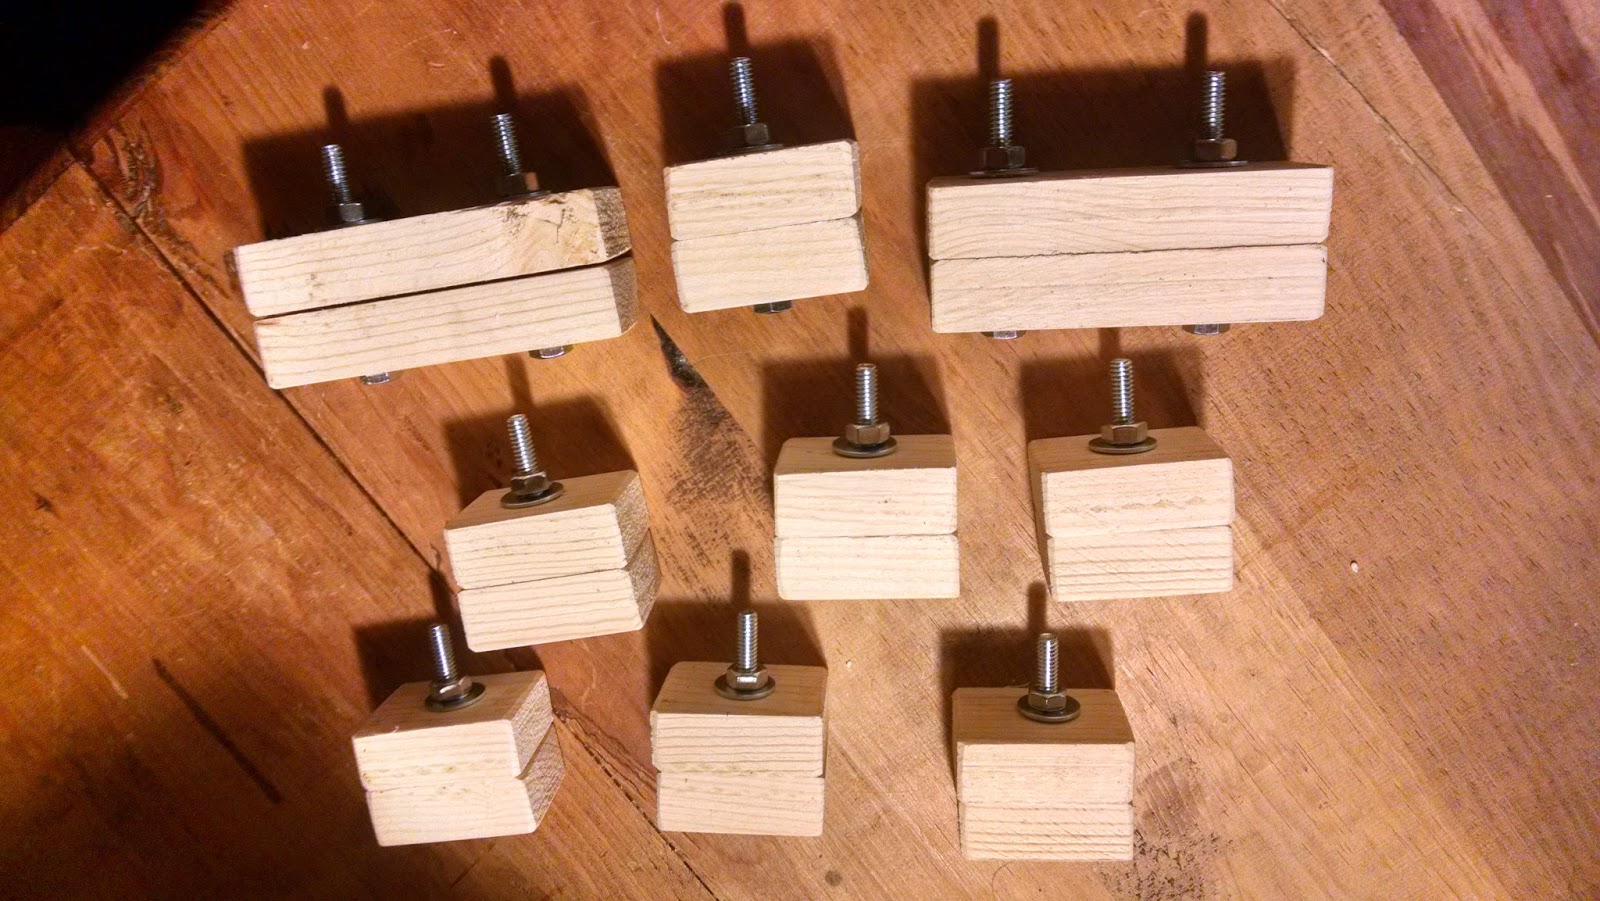
Not a painted miniature for this post, but its related. I thought I would take you through my process for building painting jigs. I was tired of always having to hold the miniature by the model itself and scrape off paint, or attach the model to a base so I could paint it, because I usually make scenic bases after painting the model. I saw something similar to these somewhere and decided they were easy enough to build so I built my own. Shadow of Shadow and Flame recently asked me for some more so I built three different styles: A single mini jig (SMJ) with one bolt, a multi-mini jig (MMJ) with two bolts, and a half single mini jig for sculpting (HMJ) for Flame to try out and see how it works.
First step is to buy the proper material for the jigs.
NOTE: all measurements here are giving in the completely nonsensical English units metric makes way too much sense to be used by 'Murica. So for my more sensible metric-using friends 1 inch (1") = 2.54cm.
Also, you can go to Online Conversion to convert any measurements here into what ever you want, so, for example, if you decide to make all your measurements in Furlongs, these guys have you covered.
1. Any length of 1 1/2" x 3/4" pine board (they make these out of all different wood but pine is cheapest)
2. 2" x 1/4" bolts with one nut and two washers per bolt.
3. miter box and saw (optional) any hand saw or electric saw will work
4. drill press (optional) any electric drill will work
5. 1/4" drill bit
I marked off the jigs into 2" sections for SMJs, 4" sections for MMJs, and 1" for HMJs. I have a miter box set up for cutting straight lines. Its not imperative that the lines are straight, but it makes for nicer jigs that are easier to work with. Cut the board up into the proper lengths, two pieces for each jig, for however many you need.

Side note: fishing gear and goose decoys pictured here are also an optional part of this process. Here is what they should look like when all cut up (except the HMJ is not pictured here):


The next step is to mark off and drill your holes for the bolts. for SMJs the hole is right in the center, 3/4" down and 1" in from the edge. For MMJs they are 3/4" down from the top and each bolt is measured 1" in from the outside. For HMJs the hole is 1/2" in and 3/4" down. OK, for this step I used a drill press and drill press vise. Again, this is completely optional, any electrical drill will work. However the drill press affords you the opportunity to drill straight holes which will allow the jig blocks to move more easily along the bolt. Clamp both halves of the jig into the vise and drill through both at the same time (to ensure the holes line up properly) with a 1/4" drill bit. IMPORTANT: For the MMJs, after drilling the first hole, run the bolt through the hole to hold the halves in place. This will ensure that the two haves don't slip any when you move to drill the other hole and the jigs will slide along each bolt much more easily.

We are getting there now. Put a washer on one end of the bolt and run it through the jig halves. Place another washer on the other end and then the nut. The size of the washer is optional. I think I used 7/8", but the bigger the diameter of the washer the more surface area of the jig sides it will apply pressure to when you tighten down the nut. I haven't had any problems with the size I am using, but you can't go wrong with larger ones:
Note: Pictured here are actually 2 1/2" bolts. They are good because you can open the jigs up further if you need to. However, this particular type of bolt is not threaded all the way to the top so the nut just barely holds the jig edges together. I like the 2" better. You just want to make sure that when the jig is closed on your mini you have threads sticking out of the side, and not the threaded part if you get that type of bolt.
Here is a picture of a jig in action, I know, breathtaking to see it work isn't it?

Final step: Congratulate yourself on a job well done, then slap a miniature in there and sling some paint at it.
I have a few miniatures I need to get photographed and uploaded so hopefully I'll have something new up here this week. In the meantime, I hope you found this useful.
Monday, February 15, 2016
I've put this off for far too long.....Rivendell Knight
This miniature has been one of the strangest journeys for me. I started it largely to test myself at painting a grey horse. Then, for what ever reason I totally and completely lost interest in finishing the knight. It has sat on the paint station, been in the background of other photos, and generally been used as comedic insult to me for well over a year. Then last week I got inspired to paint it. I am now so enthused about it that I cant wait to paint another. In the end I think it was the cloak. I think the sculpts themselves are wonderful. And the dynamic sense they give is great. However the huge surface area was a real challenge for me and that is what hung me up on finishing it. I had it a brown color not unlike the box art and it never appealed to me. And I never really had a nice theme to tie it all together. I was inspired to do some freehand work and it was either dig out some knights of Dol Amroth or paint this guy right in front of me. After that it just snowballed. I settled on a scheme and repainted parts I had already done, updated the armor and edged it all in three shades of gold and painted the banner to match which went through a few color changes itself. Wet blending and I became good friends on this one. Anyway, it was an absolute joy to paint and I am really happy with it. I plan to submit it to Warhammer Visions so they can reject it! Here it is.....finally:


As always, thanks for looking!
UPDATE: I added this guy to my CMON gallery. If you have a second to spare and could cast a vote clcik HERE. I would greatly appreciate it!
Saturday, January 30, 2016
My First Unreleased Miniatures Miniatures....Unreleased Miniatures^2 ...Miniatures from Unreleased Miniatures
Its been a long time coming for this post. I have had these minis for a while, painted for a while, but see previous excuses for my litany of reasons for not getting stuff posted on time. Anyway, on to the models. These two were from the first wave of Unreleased Miniatures work.
First up is the foot version of the "Absolutely Random Dwarf Lord". I like the pose, sort of a "bring it on you woodland sprite" look to him. Detail was good, and there was some opportunity to embellish it with paint. All in all a good model. I have yet to start the mounted version, but it's sitting on the paint table, so its not in the too distant future. However, if you have read any of my other posts and know about my Rivendell knight, you will know the previous statement is completely meaningless. Anyway, here he is:


That's all for this one. I'm still not caught up. I can think of at least one more post that needs to be made, I'll get to it....probably.
A couple Miniatures from Shadow and Flame
Wooohoooo. Internets are back up and running after a few days of being down. Yes, that's right, those two days without internet is the reason I haven't been able to post pictures of miniatures I painted last year. hahaha. True story, at least the parts before "Internets" and after "year". But my internets was down and now its back up again and so here are a few miniatures from Shadow and Flame. First up is Mindless Theoden. This is actually the first human scratch sculpt that Dave ever did. The progression of his skill is inarguable, but still this was a nice miniature to sling paint at. So I am a collector and for those of you like me who are in to the history, this is not Dave's first scratch sculpt. I wonder if any of you who actually read this blog know what Dave's first scratch sculpt was. I have it, but I have yet to paint it. Feel free to guess in the comments below (excluding Dave and Kev). If I get ten correct guesses, I'll drop my current painting projects and start on it!

On to the next one, this is another early sculpt from Dave, Mr. Albert Dreary as he appeared in "The Fellowship of the Ring". There is not a whole lot to go on from movie stills and artwork so the artistic license Dave took in sculpting him, I also took in painting him. Still its an awesome miniature to have in the collection.


On to the next one, this is another early sculpt from Dave, Mr. Albert Dreary as he appeared in "The Fellowship of the Ring". There is not a whole lot to go on from movie stills and artwork so the artistic license Dave took in sculpting him, I also took in painting him. Still its an awesome miniature to have in the collection.

I am still slowly working my way through Iron Hills Dwarves, Helmingas, and a Saruman conversion. The conversion is incredible I just don't feel like I am doing the model justice. It has been a struggle from the very beginning for me. Its going to need alot of touch up work. the dwarves and helmingas are a joy to paint, if not a little difficult to reach in some spots. I just don't do well with repetition, so I have slowed a bit. I have an idea for some freehand work on a Dol Amroth banner so I may dig that out, or, since that in itself is a chore, buy one off the trade thread, hahaha.
Well, that's it for this post. I have one more post to follow up this one today, then we will see where I end up at weeks end.
HGave fun slinging that paint.
Monday, January 18, 2016
Dunland Captain
To quote Tommy Boy, "Holy schnikies", I got another post up without a month going by. I'm n top of the world. While on the search for a Gundabad Captain I happened across the Dunland Captain blister pack. They looked like excellent models and I haven't painted a Dunlander in probably ten years. So I did the Captain and the banner (which will follow in another post). This was another first for me in that I actually used a stick to make a tree trunk and greenstuffed the root pad. I think it came out alright. And skulls. Skulls, skulls skulls, haha. I really enjoy painting them. Anyway, got another Helmingas done and working on a SWIA rebel soldier among other things that I continue to procrastinate on.


Saturday, January 16, 2016
Azog On Ice...
...no its not a Disney skating play, but agreed, it sounds like one. No this my friends is another Shadow and Flame conversion and I think its my favorite Azog pose yet. Granted it is, out of all the official GW releases and Shadow and Flame conversions the first one I have painted, but it does remain the first on that as soon as I laid eyes, I thought, I need to paint this now. So therefore here his is. It was actually painted some time ago but issues with the internets have kept me from making posts as often as I would like. But fear not (I am sure you were all waiting with baited breath, hahaha) I have been slinging paint, and lots of it.

Also, many thanks/blame to DMS I picked up the Star Wars Imperial Assault line. I painted a Nexu up. Even though this is a Middle Earth Blog I'll probably add a Star Wars page because, well is my blog and I can do what I want. hahaha. Pretty nice models. Not GW quality but pretty damn good.
Other than that I have been working on the Shadow and Flame Iron Hills conversions and you can see pictures of them assembled by Dave and painted by Kev here. I have been panting them alongside my Helmingas conversions Dave did which you can find pictures of on their Facebooks page. I'll have group shots of those once they are finished.
I got loads more pictures to upload so I'll get right on that at some point, when I feel like it, maybe. In the mean time, thanks for looking and enjoy slinging the paint!
Subscribe to:
Posts (Atom)